Tutorials
"High 5 styled symbol"

What I want to show is a step by step of how I was able to create an illustrated/photo manipulated icon for a video slot machine.
Step 1
I first want to find the base images to work with. I could sketch out a complex scene and character, but I'm going about it as if I doing this for a client and want to get these symbols done as fast as I can. So I start Google searching my media. Here below are the 3 images I'm going to use. Character, Background and the hair piece from the 3rd woman.


Step 2
Background. I make a few adjustments to the color saturation.
I then find a section of the image that I want to use for my Background and find that if I flip it I get a better composition. I then mask it out into the shape of the symbol that I'm using. Typically we use more of a rectangle, but since I'm not restricted with this project I'm going to use something a little more even all the way around and then I add an "Inner Glow/Black/Overlay"

I then Colorize the back ground with a "Color Overlay/purple"

Below, I've added some highlights to the trees on the left to give it a more illustrated look.

Added a gold frame with a purple inner glow using a shape layer in PS.

Here I used another shape layer inside the other shape layer as an inner frame for added aesthetics.

Now that I'm happy with the background. I've gone and researched some Japanese flower patterns and found this pattern you see below. I've redrawn it in Illustrator and copied it directly into Photoshop as a Smart-object. The Smart-object will allow me to make further edits to the image by doing this, it gives me the ability to manipulate it in Photoshop (PS) without destroying it's editable.

So lets add a couple of more non-instances of the flower and then remove the framing to help with the subtle aesthetics of the framing design.

Here you'll notice that I've added some Glitz. This will help to really pop that gold and add some BLING to the piece. Now lets move onto the character.

Step 3
Character. Here I've already cropped her out of her background. Make sure you're working with something large enough that you don't have to make any guess work. I like it if I can get something at least 1280x1280.
On to some slight adjustments. I've cloned out her dress strap and used the Blur and Smudge tool to soften all of the compression artifacts that come with downloading an image from the web. I want to control what I soften so I lasso everything but the Hair, Lips and Eyes and set my brush strength at 40%. Doing this will help keep a sharpness that would be hard to obtain at such a low level of detail. (Note: some re-artifactation will show since viewed over the web)

Now I've give her a more porcelain appearance. she appears to be of a higher class.

Here I completely de-saturated her and enlarged her eyes. I do this because I'm going to use a few adjustment layers in PS to help merge her with the background framing and I've enlarged the eyes because people tend to find that more appealing with illustrations.

I've now painted in the hair and and a bit of subtle white to the teeth

Here's my first Selective Color adjustment layer. I've added some warmth back into the skin. I've also adjusted more the hair to give it more of an illustrated appearance.

Now for the second Selective Color adjustment layer. I'll be adjusting the eyes. I've masked out what only effects the eyes.

And the third Selective Color adjustment layer I give life to the lips.

Here I add an Overlay Color-pass to merge it with the background symbol.

I bring in some soft rim lighting to the left hand side.

now I add a hard rim light to the left hand side.

Here I've added some ambient back lighting.

She was looking a bit DEAD, so I've added back in some warm orange to give her some life.

Step 2
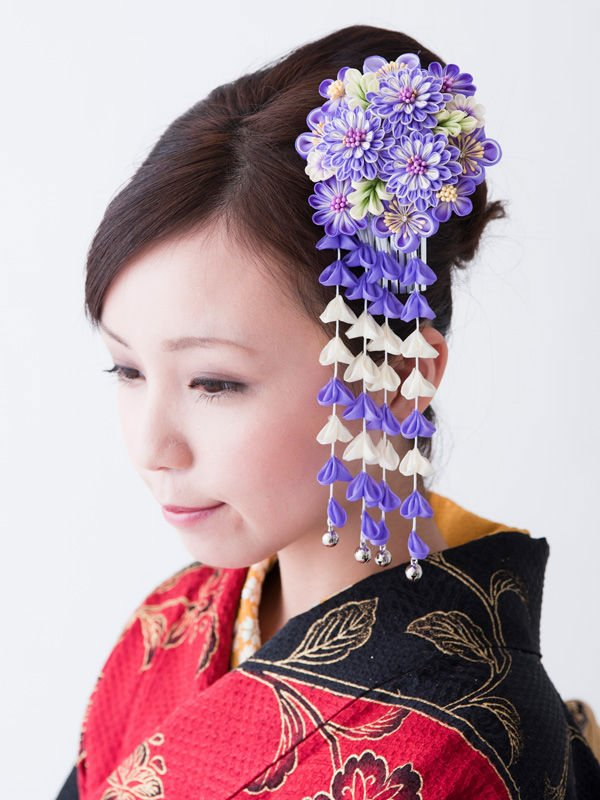
The Hair Piece. I searched high and low for this piece which I still find second rate. I was looking for something that was a little bit more jeweled, but I'll settle for this since it will be an easy match to my characters perspective.
Here I've clipped it out.

Added and "Inner Glow" .

Added a show to help with adding some dimension to the hair piece.

added drop-shadow.

And finally, applied a "Gradient Overlay" to merge with the our character.

Hey now, doesn't that look nice. :)

Now lets bring it all together.

Comments
Post a Comment